Overview
Currently, we are in the process of creating comprehensive and up-to-date documentation for our products. While we don't have it ready just yet, please check back frequently as we will be publishing new content regularly.
Commercial Modules
Direct Debits Module
The Sage 200 Direct Debits Module allows you to collect payments from your customers by direct debit using the Banks Automated Clearing Service (BACS).
Both the SL Account screen and the CB Account screen have been modified to allow customers and bank accounts to be marked as available for direct debit collection. New fields have been added to store all the information needed for collections, and the user has the ability to generate AUDDIS files (in generic format and BACS Standard 18 format).
Once accounts have been flagged and the required information populated, the user is then able to create and maintain ‘Batches’ of transactions within a new screen within Sage.
A filter screen has been added to allow users to quickly populate and select which transactions to include in the batch. The user can choose to amend the collection value (potentially splitting the amount to be collected for an invoice over multiple batches) as well as being able to include ad-hoc transactions should they require.
The Direct Debits Module will also allow users to automatically generate and send notification emails to all of the customers contained within a batch (these emails can be customised on request). If paper notifications are required, then collection letters can be produced for those customers who do not have an email address on their account.
When it comes to generating the actual output file, batches can be exported to a range of supported file formats, including BACS Standard 18 and SEPA for International Collections (further file formats can be created on request). Once a batch has been exported, physical transmission to BACS can be done via transmission software such as ALBANY, though in most cases the banks provide their own software to achieve this.
Finally, once a batch is ready for processing, the Direct Debits module will allow the user to post all of the transactions within a batch to the sales ledger, performing the receipting and allocation processes automatically.
Our Direct Debits Module also offers support for a range of plugins, should their use require further customisations than the base module provides. We offer a Scheduled Payments Plugin (detailed below), which will allow the user to schedule a payment or invoice to be collected over a range of dates.
Setup and Menus
Sage 200 Menu
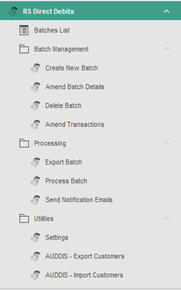
Main Desktop List
Create New Batch: Screen to create or set up the details of a new batch.
Amend Batch Details: Screen to amend details for an existing batch.
Delete: Screen to allow the user to select and delete a batch from the system.
Amend Transactions: Screen to allow users to maintain transactions included within a batch.
Export Batch Screen to select and export a batch to a selected file format or location.
Process Batch: Screen to select a batch and post or allocate receipts to the sales ledger.
Send Notification Emails: Screen to allow users to send notification emails for a selected batch.
Settings: Screen to maintain various settings for the Direct Debits Module.
AUDDIS—Export Customers—Screen to allow users to create AUDDIS Instructions files for new customers requiring setup with BACS.
AUDDIS: Import Customers: Screen to allow users to quickly flag and import direct debit information for customers via CSV import.
Screens Modifided
Amend Customer Details (Sales Ledger)
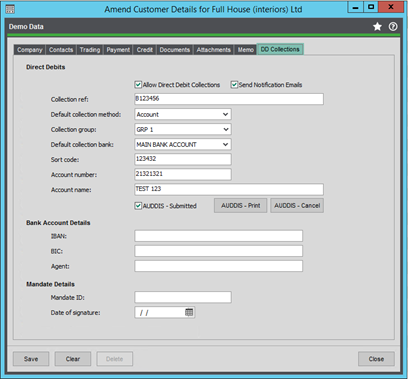
Send Notification: Used to specify if a notification email will be sent to the customer; if not checked, nothing will be sent; if checked, see the screenshot below.
Collection Ref: Needed for the output file.
Collection Method: Not currently in use; leave as direct debit.
Collection Group: Used to group customers for filtering transactions to add to a batch.
Collection Bank: Must be populated; required when filtering transactions.
Sort Code/Acc No/Acc Name: Needed for the output file.
IBAN, BIC, Agent: Needed for the output file. (International Mode)
Mandate Details / Debtor ID: Needed for the output file. (International Mode)
AUDDIS Print / Cancel: Can be used to generate instruction files for BACS (new customers or cancelling customers).
SendNotificationsTo: If the Send Notification Emails option is checked, then the relevant contact will need this role added with the correct email address. This will be used when sending notification emails.

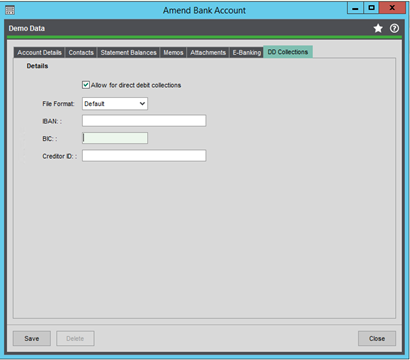
Amend Bank Account (Cash Book)
File Format: Used to specify which output file is used when exporting a batch.
- Default: CSV/BACS Std18 Format for BACS
- Deutsche: SEPA Format for Deutsche Bank
- Danske: CSV Format for Danske Bank
IBAN, BIC, Creditor ID: needed for the output file (international mode)
Settings
Batch Numbering: Toggle auto-generation of batch numbers.
General Settings: International Mode will toggle extra controls on the SL account screen. Company/SUN will be needed for output files.
Integrated Modules: SL by default; SOP option should the customer require bespoke integration with the SOP module.
SMTP Settings: Needed for notification emails to work.
Collection Groups: Maintaining collection groups here can be used to make filtering transactions easier and allow more control over batches.
License: Display license information, days remaining, etc.

Maintaining Batches
Creating Batches
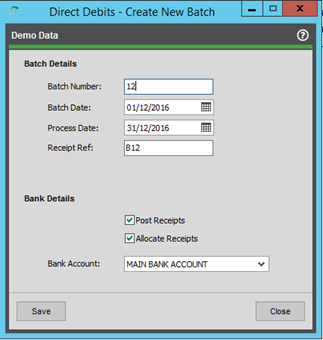
When creating a batch, the user will be presented with the below screen. Certain fields are required and can be amended when needed, assuming the batch has not been processed already. Historical batches can be viewed in read-only mode if required.
Should the user require a batch to be deleted, the menu option can be used to do this.
⚠️ Warning: Once deleted, there can be no reversal. All information and entries related to that batch will be removed.
Batch Number: Required - The identifying ‘number’ for this batch can be automatically generated or manually entered.
Batch Date: Required - The date the batch was entered into the system.
Process Date: Required - The processing date for this batch. Transactions are only valid for use in this batch if the transaction due date is prior to the processing date.
Receipt Ref: Used as the Transaction Reference when posting a completed batch to the Sales Ledger.
Bank Account: Required - The bank account selected for this batch Used when filtering transactions.
Amending and Viewing Transactions
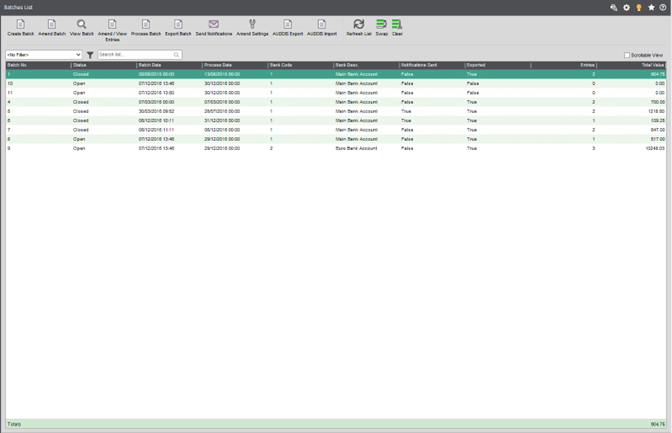
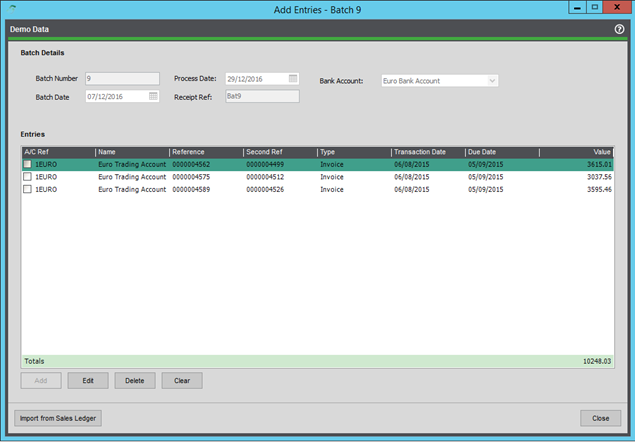
Once a batch has been created and the details populated, the user can then begin adding transactions to the batch. The screen below will show details of all transactions linked to the selected batch.
The user has the ability to add or remove entries from the batch. Transactions included in the batch can also be amended should the user wish to collect a portion of the value now and then the remaining value at a later date or part of a later batch.
Batches can be amended up to the point of processing. However, the user must ensure they remember to export or update notification emails afterwards.
Manual ‘Ad-hoc’ Transactions can also be included as part of a batch, and if the user has the Scheduled Payments Plugin, those will also show on the below screen.
The Import from Sales Ledger button will direct the user to the filtering screen, as detailed below.
ℹ️ Note: A batch can include multiple customers; however, they must share the same bank account or currency as the batch.
ℹ️ Note: Transactions can only be part of a single batch.
ℹ️ Note: Manual transactions are not linked to anything in Sage.
Filtering Transactions
Here you will be presented with several filters that can be used to easily find the relevant transactions you need, i.e., for a specific customer or collection group.
The option to include various transaction types is by default set to allow invoices only; however, other transaction types can be included in a batch.
Once you have selected your chosen filters, hitting display will present you with a list of all valid transactions that can be added to that batch. There are several criteria that determine this, such as:
- Is the account enabled for collections?
- Is the transaction already included in another batch? If so, hide it.
- Is the due date on the transaction before or equal to the process date on the batch?
- Is the transaction unallocated?
- Has the transaction queried flag been set? If so, hide it.
Once that process is over, you can add the chosen transactions to a batch, either by selecting all or individual transactions and then clicking Add Transactions.
ℹ️ Note: You cannot add transactions that are not of the same currency, nor can you add transactions that cause the total for that customer to go below zero.
Transactions can be removed if needed, freeing them up for selection for another batch.

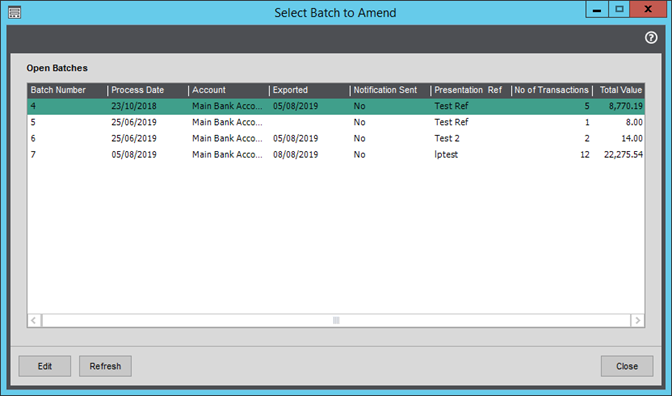
Amending Batch Details
Using the Amend Batch Details form, the user can select a batch number from the grid and use the ‘Edit’ button on the form to amend the following details:
- Batch Number
- Batch Date
- Process Date
- Presentation Date
- Presentation Ref
Processing Batches
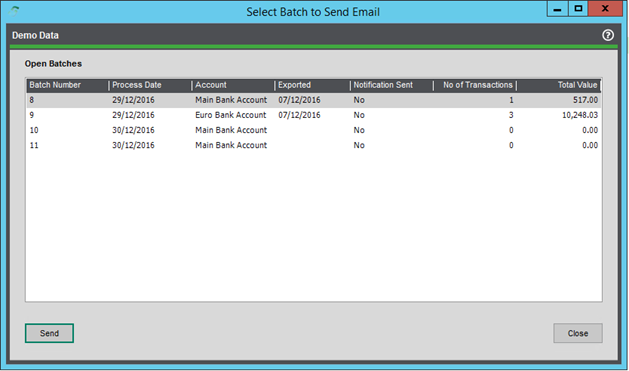
Send notification emails
Before you process a batch, you will have to send the relevant notification emails out to indicate to the customer that the total value of transactions for that customer will be taken out of their account on the indicated date, in this case, the process date. The grace period for these notifications will vary, but is usually around 10 days.
This will send out a simple HTML-formatted email to any customer in that batch that has been enabled to allow notification emails to be sent and has the relevant contact role or email added. Those customers that do not have an email address enabled will have the option to instead be printed off as a collection letter report at the end of the process.
Once notification emails have been sent, you will be shown a report summarizing the batch and its totals. This can be saved or printed out if needed for later reference.
ℹ️ NOTE: The SMTP settings will need to be correctly configured before you can send notification emails; the sender address will also need to be set; it is read from Company Contact Details under Accounting System Manager > Settings > Company Details.
ℹ️ NOTE: Emails can be customized on request.
Exporting the batch
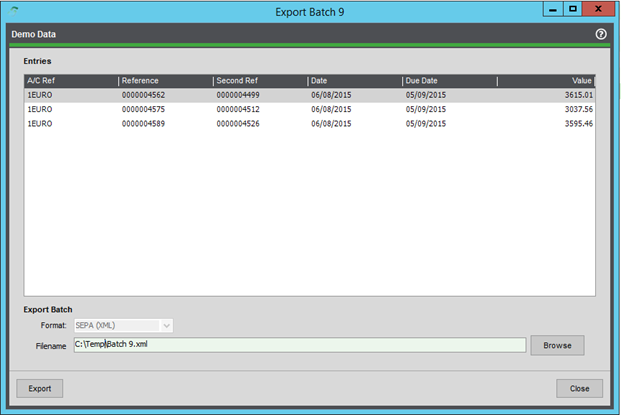
Once you are ready to begin processing the batch, you will first need to export the batch as the relevant output file using the below screen.
Here, you will be presented with the details of the batch contents. Click Browse and specify the name of the output file and the location to save to, and the rest will be done automatically. The output file format is specified by the collection bank’s output format, which is set on the Amend Account screen.
Once generated, the file is typically processed through some form of transmission software, such as ALBANY, or handed to the bank. Most banks have their own software or process to handle this.
Current formats supported include:
- SEPA (XML)
- Danske (CSV)
- BACS Standard 18 (TXT)
- Default (CSV)
ℹ️ NOTE: Further formats can be developed on request.
Processing the batch
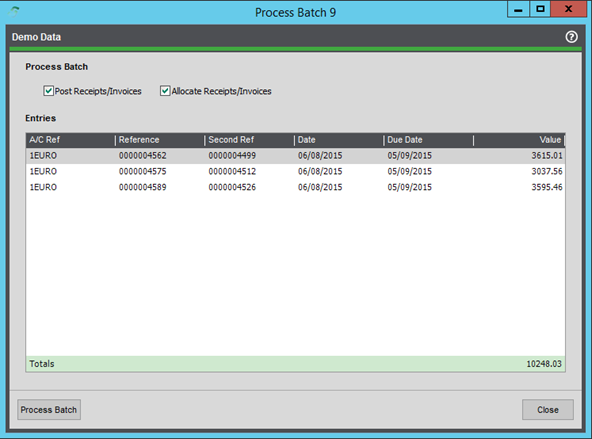
Once you have sent notification emails out and exported the batch and it has been processed by the bank, you will want to come back and close the batch off in Sage. This can be done using the below screen.
Processing a batch will post and allocate a batch receipt and allocate off the individual transactions that are a part of that batch. If you need to, you can post the batch receipt first, then allocate it at a later date.
ℹ️ NOTE: The receipt reference on the batch will be the transaction reference, and the process date will be the transaction date when posted.
Once everything is allocated, the batch will be flagged as closed and will no longer be amendable.
Generating AUDDIS
Export Customer Details
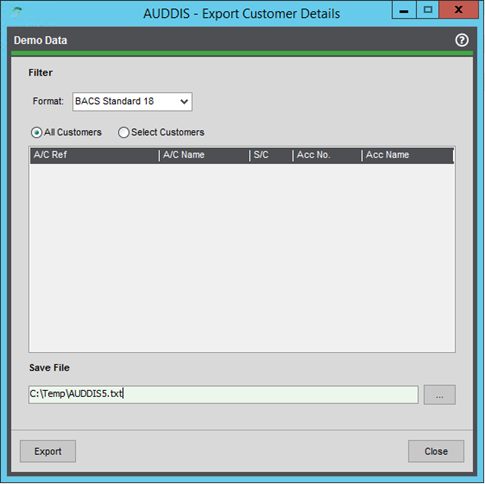
AUDDIS files are required by BACS when setting up a customer for direct debit collections. These can be generated from the Export Customer Details screen, as shown below. Once exported in the chosen format, these can then be forwarded to the bank for processing.
Any customer that has been flagged for direct debit collections but has not had instructions submitted will be selectable from this screen; once an instruction file has been generated, the account will be flagged as submitted. This is a soft lock on the customer account screen (see direct debit tab) and can be overridden if needed. That way, a file can be reproduced if needed.
Cancellation instructions can be generated from the customer account screen as well.
Import Customer Details
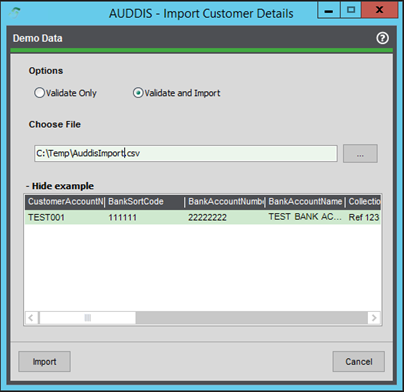
The below screen can be used by the user to quickly import Direct Debit details for multiple customers at once. An example of the format required by the import file is shown below. Once imported the customer/s is flagged to enable collections and is ready to go.
ℹ️ Note: Any problems with the import file will be displayed on a new screen after validation.